

This short tutorial applies only to Photoshop CS4 but I know some of you have already got your hands on a copy of it and this is such a great new tool I think its worth spending a little time looking at.
You can download a pdf of this tutorial here
The Adjustment Brush in Camera Raw - Photoshop CS4
Adobe Camera Raw is the tool that Photoshop Uses to Read your RAW files be they .RAW for canon users or .NEF for Nikon users – Adobe Camera Raw is the application that will by default open up those files for you to process. .
You can also open Jpg and Tiff files with Adobe Camera raw by right clicking on the file in bridge and choose Open with Camera Raw.
There is a lot to Camera Raw but today Im just going to touch on the Adjustment Brush which is a new tool to CS4.
Basically the Adjustment brush allows you to apply localised changes in a range of settings just to the area you desire simply by brushing them on.
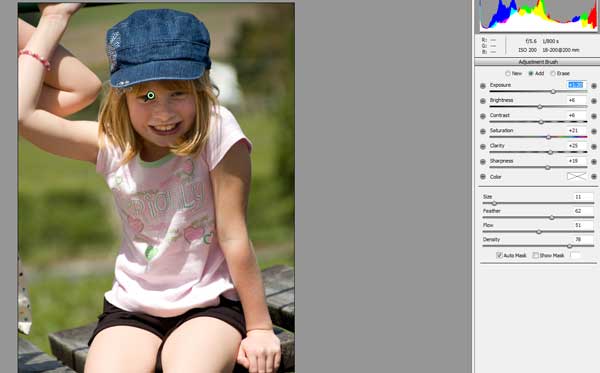
This photo below of my daughter is a really cute photo but the brim of her hat really put some dark shadows on her face which spoil it a bit.

There are other general changes I would probably make to this photo but right now Im just going to concentrate on that face area.
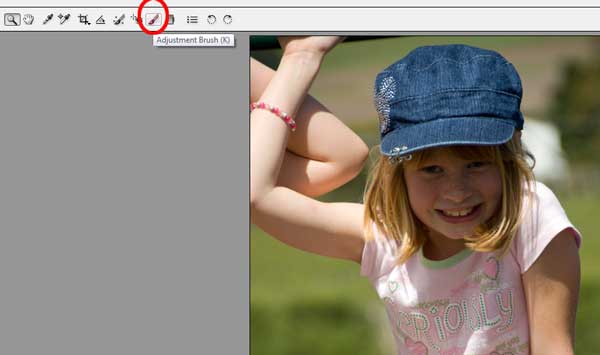
The tool bar in Camera Raw is up the top of the window.
Click on the Adjustment brush icon .
The settings panel that opens shows the various options you have to apply with your brush

Click on the New radio button to apply your settings to a new brush.
For this photo I would like to lighten up the exposure and brightness to Hannahs face.
Im also boosting up the clarity and sharpness to add some definition
The bottom section of the panel refers to the brush itself – you can choose the size brush for the purpose your require, and you can adjust the amount of feathering – Ive chosen a really soft edge so that the transitions of the adjustment blend in well.

Start painting with your brush on the area you want to alter – you can see here the shadowed area has started to lighten as I paint over it .
If you find the adjustment is not enough you can add to it by repainting over it - ( the radio button will automatically change to add when you rebrush over that area)
Alternatively you can move the sliders after you have painted to fine tune your adjustments
The adjusted areas are signified by a pin. You can apply multiple changes in various areas to your image and if you want to return to a previous one you can just click on that pin to select it -
You can delete areas by clicking on that pin and hitting the delete key.

As you can see this made a big difference to the look of this photo.
Im sure you will find the adjustment brush one of the most useful new tools in Photoshop CS4.
Gee, Lauren, now you make me want to upgrade just for this tool. I have a ton of pictures just like this that need fixing.
ReplyDelete