

Add years to your photos instantly
Tutorial uses Adobe Camera Raw 5 and Photoshop CS4
This tutorial uses the latest version of Camera Raw( 5.2) for Photoshop CS4 but will work with earlier versions of Camera Raw with CS4.
You can download the Camera Raw 5.2 update from http://www.adobe.com/downloads/
You can download a pdf version of this tutorial from here
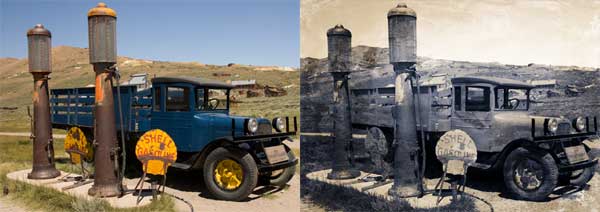
In a recent layout I used a photo I took at Bodie ( a ghost town in California) – some people thought I had used an old photo but in fact it was only taken last year.
I achieved the aged look by using a simple method using Camera Raw and Photoshop CS4
Camera Raw is a great way to make improvements and to apply effects to your photos. It works best as you would imagine on RAW photos but it can also be used for jpgs.
To open your jpg in camera raw, from bridge right click on the image and choose open in Camera Raw. If your image is already raw double clicking on your image will open it in Camera Raw.

We are going to turn this photo black and white.
To do this in Camera Raw choose the HSL/Greyscale Icon .
Check the convert to Greyscale box. This will desaturate your image. You can now play with the sliders to lighten or darken any of the particular areas of your image that you wish.

If you have the latest incarnation of Camera Raw you will have access to the Targeted Adjustment tool .
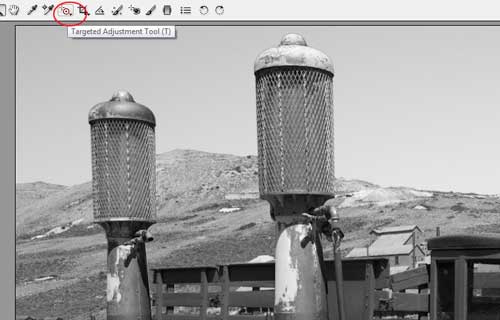
Using this takes away the guess work as to which slider to move . Simply click on this tool in the tool bar and then move your mouse to the area of the photo you wish to darken or lighten and drag left to darken and right to lighten. The changes will be applied to the tonal areas of the spot you have chosen.
If you have an older version of Camera Raw you will need to use the sliders to achieve the changes.

Once you are happy with your adjustments you can move to the next step which is to apply a split tone effect.
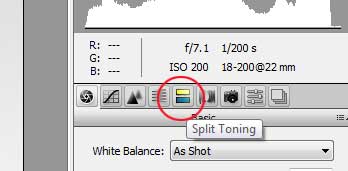
Split toning was a photographic process where chemicals were added to the processing mixture to achieve different tints to different parts of a photo but in Photoshop it is much easier because we are just applying one tint to the highlights of an image and another tint is applied to the shadows.
Its a good method for achieving an aged look to your black and white images.
What colours and what saturation levels you choose is completely up to you.
I have chosen a pinky cream sepia tone for my highlights and a blue tone for my shadows

This is all we need to do in Camera Raw so you can go ahead and choose open image now to open the file in photoshop for us to complete the aging effect.
In order to finish off the image we need to add a grungey overlay.
There are many sources of grunge textures on the internet, or you could use a grungy overlay from a product from DSP.
Photographs of rusty walls, stained concrete, old painted surfaces make great grunge overlays.
I am using a texture of some old film that was a free giveway on this site
http://www.bittbox.com/freebies/free-texture-tuesday-old-film/
Its good to look for a texture with a good range of tones from dark to light.

Paste your texture image over your photo image.
Reduce the opacity, and cycle through the blend modes till you find one that gives you the result you like.

For my image I reduced the opacity to 65% and used the overlay blend mode

Thanks, Lauren! That is an awesome tutorial! Cant wait to use it!
ReplyDeleteJaeDee
Wow, brilliant Tut, Lauren. Beats just changing the photo just to Sepia! And a special thanks for including the PDF file. You're the greatest.
ReplyDelete