I mentioned in my blog the other day how much Im enjoying using Topaz Adjust on some of my photos.
I love the boost it can give a photo that might not quite have captured a scene as I remembered.
Im not really one who uses a lot of filters or actions on my photos. I have lightroom 3 and Photoshop CS5 and honestly I dont really want to spend any more money on software!!
Having said that I had seen Topaz adjust mentioned by several photographers I follow and respect (Trey Ratcliff and Rick Sammon come to mind) and I downloaded the trial to play with and was immediately hooked and had to purchase it!!
I’m so pleased I did too because I love the effects I can achieve with such ease.
Topaz Adjust is a very simple application to use. You cant make a mistake using it - you can only have fun!!
I prefer to use it from within Photoshop so if I’m editing my photos in Lightroom or bridge I open the image in Photoshop.
Once the image is open in Photoshop I duplicate the background layer and work on that duplicate layer.
When the image opens in Topaz Adjust you are offered an array of presets to start with .
The preview screen on the top left will update as you run your cursor over each preset to give you an indication of the results .
The changes to your image range from subtle contrast improvements to some quite fantastic and out of this world type effects.
Each image is affected in different ways by each preset depending on the tonality and contrasts in the original image, so what works well with one image might look quite hideous on another.
Trial and error is the best course I find when finding a good preset to start off with.
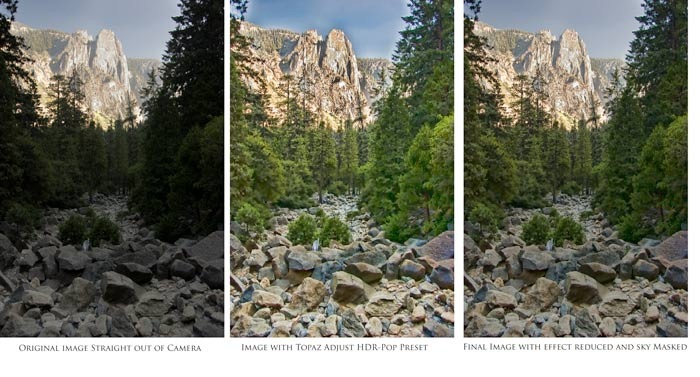
The image above of Yosemite suffered badly from contrast issues. The camera just couldn’t capture the scene as I saw it due to the very dark for and midground contrasting with the very bright distant cliffs.
The result was an image that is under exposed in some areas and over exposed in others and really just didnt capture the scene at all.
Scrolling through the presets I find I like the effect of the preset HDR Sketch although I find it slightly over saturated and just a little bit too fake looking
This is no problem as I can click on the preset to apply it and then use the adjustment sliders on the right to make some changes to the effects.
Have some fun playing with the sliders – experimenting is the best way to find out what sort of effects you can achieve.
For this image I just reduced the saturation boost in the colour section of the panel and on zooming in discovered the image had accentuated the noise in the darker areas so I just dragged the noise reduction sliders up a bit.
I don’t like the sky area very much but Im going to deal with that area in Photoshop.
So I hit Ok and return to Photoshop.
In Photoshop I reduce the opacity of my filtered layer to lessen the effects just a bit , and apply a mask to the sky area, to allow the original sky area to show through from the layer below.
Here are the three versions below – Original, Image straight out of Topaz, and Final image
You can download this post in PDF form here


Thanks! I"ll share this on Twitter (and it eventually will get to my twitter round up on my blog)
ReplyDeleteThanks for this little tut, Lauren. I experimented a little with the presets. Now on to fine tuning.
ReplyDeleteThank you so much for this post. I want to let you know that I posted a link to your blog in CBH Digital Scrapbooking Freebies, under the Page 4 post on Feb. 08, 2011. Thanks again.
ReplyDelete